Does back pain occur after lifting?
Do certain exercises get skipped because of fear?
Many people share these concerns. A stronger back remains the goal. Wrong exercises get chosen. The right exercises are performed poorly. Injuries follow. Training stops.
None of that is necessary.
Hundreds of lifters have built strong backs without pain through proper technique. Fancy equipment is not the secret. Five basic barbell exercises done correctly make all the difference.
The spine can handle heavy loads. Research confirms that spinal loading does not predict injury or back pain. Weight is not the problem. Poor management causes issues.
A 2024 study in the Journal of Biomechanics revealed an important finding. Keeping the bar close to the body reduces spinal load by up to 40 percent. Science backs up what good coaches have always taught.
Related: The Best Lower Back Exercises to Power Up Your Back
Top 5 Back Exercises With Barbell
These five workouts strengthen your entire back. Lightweight is a good place to start. Prioritize form.
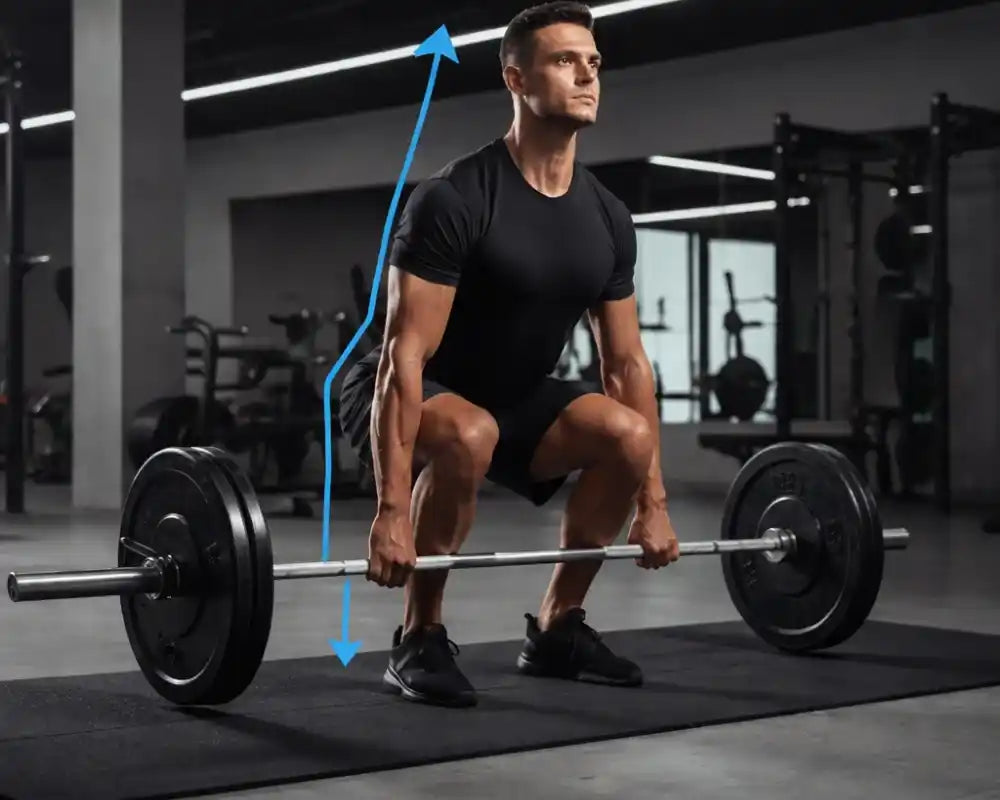
1. The Conventional Deadlift
Targets: The entire posterior chain (Hamstrings, Glutes, Spinal Erectors, Traps, Lats)
This is the lift I would choose if I had to choose just one to save humanity. The deadlift is a full-body defiance of gravity, not just a back workout. The spinal erectors are stimulated during the deadlift at a rate that machine-based isolation exercises cannot match, according to recent sports science research.
The Setup (The "Quiet" Phase):
Most people mess up before the bar even leaves the ground. Walk up to the bar until it covers your shoelaces. Hip-width stance. Take your grip just outside your knees.
The Pull (The "Loud" Phase):
Here is the cue I give all my clients: Do not pull the bar up; push the world away. As you drive through the floor, keep the bar in a vertical line. If it drifts away from your shins, you are losing leverage and risking injury. Lock out hard, then guide it back down with control.
Common Fix:
If your back is rounding, it's usually a setup issue. Drop your hips slightly and lift your chest before you pull. You aren't lifting a suitcase; you are prying the floor open.
Explore More: 7 Common Barbell Row Mistakes: How to Fix Your Form
2. The Yates-Style Row (Underhand Grip)
Targets: Lower Lats, Rhomboids, Biceps Brachii
Dorian Yates didn't win six Olympia titles by accident. He popularized the underhand (supinated) grip barbell row because it allows for a superior contraction in the lower lats—the area that gives you that "wings" look.
Why this variation?
When you reverse your grip, that tucks the elbows in closer to your sides, takes more of the stress off the upper lats & mid-back, and places it onto the latissimus dorsi further down. It also allows you to handle a bit more load, but be careful. That ego can cut both ways.
Execution:
Bend over with a slight hinge, keeping your torso at about 60 degrees, not parallel. Pull the bar toward your hip line, not your chest. Squeeze like you are trying to leave fingerprint dents in the knurling. Lower the bar with a 3-second negative.
Pro Tip:
If your biceps are cramping before your back is tired, you are "curling" the weight. Imagine your hands are merely hooks; your elbows should be driving behind you, not curling up toward the ceiling.
3. The Pendlay Row
Targets: Upper Back Thickness (Traps, Rhomboids), Spinal Erectors
Named after the legendary coach Glenn Pendlay, this is the strictest row you will ever do. Unlike a bent-over row, the bar comes to a complete dead stop on the floor every single rep.
The "Reset" Advantage:
By dead-starting each rep, you eliminate momentum and stretch reflexes. You are forcing a pure concentric contraction from a dead stop. EMG data suggests this variation leads to superior activation in the middle traps because your body cannot cheat.
How to Nail It:
Torso parallel to the floor. Back flat. Explosively pull the bar to your sternum. Lower it to the floor. Pause. Reset your brace. Repeat.
Coach's Note:
This is humbling. You will use less weight than you would in a standard row. Good. That means you are actually working.
4. The Barbell Dead-Stop Shrug
Targets: Upper Trapezius
Stop rolling your shoulders. I mean it. If I see one more person doing circular shoulder rolls with a barbell in a misguided attempt to hit their traps, I'm going to lose it.
The traps are designed to elevate the scapula (shrugging up) and retract it (pulling back). Circular motions are a fast track to impingement.
The Fix:
Hold the bar at arm's length. Think "pockets to ears." Drive your traps straight up the ceiling, as if you were trying to bring them in contact with your ear lobes. Make your squeeze last at least one full second. Lower with control.
Why it matters:
Strong traps aren't just for aesthetics. They provide a stable platform for heavy deadlifts and overhead pressing, protecting your cervical spine (neck).
5. The 45-Degree Bent-Over Row (Overhand)
Targets: Upper Lats, Rear Delts, Postural Strength
While the Pendlay row builds explosive power, the classic Bent-Over row (with a continuous tension style) builds postural endurance.
The Setup:
With an overhand (pronated) grip, hinge back to about 45 degrees. Let the bar hang at arm's length, feeling a deep stretch in the lats.
The Movement:
Pull the bar down to the lower chest. At the top, focus on pulling your shoulder blades together. Try to imagine you are crushing a walnut between them.
The "Desk Worker" Benefit:
This exercise is therapeutic for anyone who spends all day at a computer. It strengthens the rhomboids and rear delts, pulling the shoulders back into their natural position and reversing the "hunch" we get from typing.
How to Avoid Back Injury During Barbell Rows
Injuries happen when form breaks down. Here is how to stay safe.
Keep your back straight.
This is rule number one. A straight back spreads the load evenly. A rounded back puts all the stress on your spine.
Before each rep, check your position. Look in a mirror if you have one. Ask someone to watch you.
Engage your core
Your core is not just your abs. It includes muscles all around your midsection. Tighten them like someone is about to punch you in the stomach.
Hold that tightness through the whole movement. It protects your spine.
Use the Valsalva maneuver
Take a deep breath before lifting. Hold it while you lift. This increases pressure inside your abdomen. It supports your spine from the inside.
Release at the top or after the rep. Then breathe again.
Keep the bar close
The farther the bar is from your body, the harder your back has to work. Keep it touching your legs on deadlifts. Keep it close to your chest on rows.
The same 2024 study found that minimizing horizontal distance between your body and the bar was critical for spinal protection.
Control the weight down
Most people only think about lifting. But lowering the weight is just as important. Lower it slowly. Count to two or three on the way down.
Eccentric loading builds muscle and strengthens connective tissue. Do not waste it.
Stop if form breaks
If you feel your back starting to round, stop. Rack the weight. Rest. Then try again with a better form or a lighter weight.
Pain is a warning sign. Do not ignore it.
Also Read: How to Avoid Common Squat Injuries
Frequently Asked Questions
Q: Barbell vs dumbbell for back, which is better?
Both work. But barbells let you lift heavier. Heavier weight means more strength gains.
Dumbbells allow a greater range of motion. They also fix muscle imbalances since each side works independently.
Use both. Do barbell work for heavy compound lifts. Do dumbbells work for accessory exercises
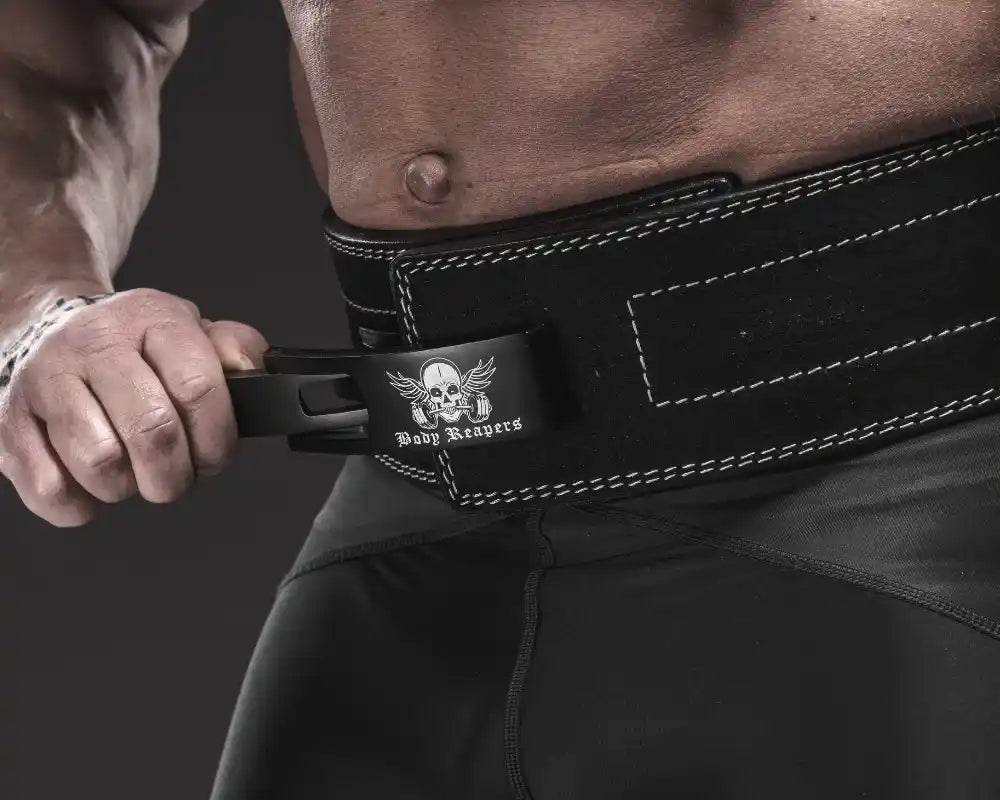
Q: Should I use a lifting belt?
Use a belt for heavy sets. One to five reps at 85 percent or more of your max.
Do not use a belt for every set. Training without a belt strengthens your natural core stabilizers. Use beltless warm-ups and lighter sets.
Take photos every 4 weeks. You will see progress even when you do not feel it.
Recommended Gear

Leave a comment
This site is protected by hCaptcha and the hCaptcha Privacy Policy and Terms of Service apply.